Blog

Memorial For A Beloved Friend


Over the past couple of years that I have been writing this blog, some of you have gotten a glimpse of my handsome black cat, Kaimana. In Hawai`ian, Kaimana means “diamond.” He was solid black with a little white spot under his chin like a diamond necklace.

He’s been with me for about twelve years. He became mine when he kept pawing at me through the bars of his cage at the Humane Shelter. Only a little older than a kitten, he quickly took up residence in my heart and home.

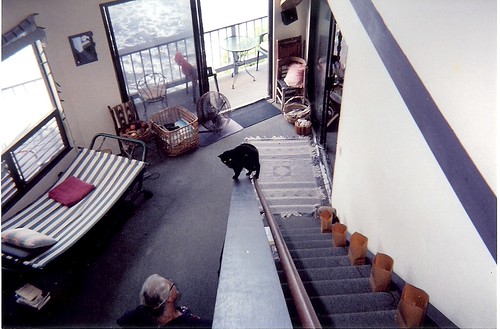
In my home on Alii Drive, he worked diligently to climb up the railing of the staircase. If he fell off half-way up, he’d jump down and start over. The first time he made it to the top without falling off, he sat at the top proclaiming his victory.


Then he spent the same amount of time learning how to go back down the railing without falling off. Once he learned both directions, he went up and down, up and down.


Like most cats, he could sleep anywhere and at any time – in a bowl. . .


. . . in a bidet . . .


. . . on a high shelf . . .


. . . in a bookshelf . . .


. . . or tucked in among the pottery.


Kaimana was the ultimate “techno-cat.” Whenever he heard the ring of the fax machine, he would run upstairs, sit on top of the machine and watch the fax arrive. I think he was trying to get it out to bring to me.


A rocky medical history resulted in several major hospitalizations. Even though it meant extending his life by several years, wearing this collar made him quite angry.


He loved to wander around the property as I worked . . .


. . . or lounge on a fallen log . . .


. . . or nestle up to the geraniums.


Always content to be wherever I was, he also loved to watch what was going on outside his world.


I wonder if he thought he was hiding from me?


I found out how sick he was with diabetes while my daughter was visiting, so I made arrangements for him to be put to sleep this past Wednesday. She helped me find the appropriate place for his final resting place and started the digging process.


As Inga was digging, Kaimana came out to see what we were doing. After investigating, it seemed as if he approved of where he would finally rest, so he went up to the house to take a nap.


I have put together a slideshow of pictures for those who knew him, or who would just like to see a beautiful cat at play and at leisure.

http://picasaweb.google.com/s/c/bin/slideshow.swf


If you would like to view a larger slideshow, click here.

A hui hou!

Cran-Apple Crumb Pie

Before baking
Before baking


It has become a joke among some of my friends that they can always find a huge bag of cranberries in my freezer. It’s true! I find all sorts of uses for them throughout the year. Because it’s such a beautiful red, I’m making one this week for my significant friend for Valentine’s Day. I posted this over a year ago for Christmas, but I have new readers who might be interested, too. The picture above is just before it goes into the oven.

My crust recipe is one I found in a magazine back in the 50s (early marriage) and I have not rolled out a pie crust since then. Everyone wants to know how it’s made because it is so tender and flaky. I’ve shared it before online, and I hate for it to get lost.

No-roll Pie Crust
Place 1 ½ cup flour, 1 ½ teaspoon sugar and ¼ teaspoon salt directly into an ungreased 9” pie pan. Pour out ½ cup canola oil, then add 2 tablespoons cold milk and mix with a fork until milky. Pour into flour mix in the pan and stir it all together. Press the mix into the pan until it resembles a regular pie crust. Leave enough up on the sides to squeeze into a rim.

It’s light and flaky – doesn’t leave a mess and never requires rolling out!

Lucy’s Cran-Apple Crumb Pie


1 cup sugar
¼ cup flour
4 cups peeled, sliced and chopped apples ( I use Fuji, but any apple will do)
2 cups fresh or frozen cranberries
Preheat oven to 425 F. Gently mix berries, apples, sugar, and flour until fruit is coated. Dump into pie crust and top with crumb topping.

Crumb Topping


1 cup packed brown sugar
1 cup flour
½ cup (1 stick) chilled unsalted butter (I use half butter and half yogurt spread).
Mix together until crumbly, and put over top of pie.
Bake about 40 minutes. You’ll know it’s done when it starts to bubble and brown.

Here it is right out of the oven. Needless to say, wherever I take this, I have only an empty dish to bring back home! Imagine this with a scoop of vanilla-caramel swirl ice cream on top. Oh my!

Fresh from the oven
Fresh from the oven

Makes me hungry just to write about it!
A hui hou!

Drip…Drip…drip!


With the increase in number of plants that require watering, it’s become a time-consuming task to get to all of them as much as they need it. Also, too much water doesn’t make it to the plant, no matter how careful I am. In this unusually dry season, conservation of water is a priority.

My daughter, Inga, came to see me this past week, making her winter visit to get out of the cold Idaho weather. She asked if she could do a project of creating a dripper system like one she had recently installed at her own home. I jumped at the opportunity!

We stopped by Home Depot to talk with the helpful clerk there and purchased all the items she needed. We learned several things along the way that will make the next system easier.

Our first lesson: 500 feet of larger diameter tubing is too much to work with at one time. From now on, I will need to cut it into manageable pieces and use connectors. As she was unwinding it, it all became too entangled.


Our second lesson: Let both the larger diameter tubing and smaller ¼” tubing set out in the sun to make them more pliable. In fact, she found that soaking the smaller tubing in very hot water for a while made it so much easier to work with. You can see the pan here beside her as she works (plus my shadow as I took the picture).


Our third lesson: Wear sturdy gloves! Cutting the holes and pushing the emitters and connectors into the tubing can be hard on your hands after a while. The blue object in her hand is the hole punch. First, she punches a hole in the larger tubing, then into that she inserts the ¼” tubing with a connector. At the end of the smaller tubing, she inserts the emitter and sets it close to the plant.


Here is a close-up of the connection between larger and smaller tubing.


Here you can see the emitter, where the water drips out onto the plant (in case you wondered)!


She ran the line all around my bananas, coffee, plumeria, blueberries and more.


Our fourth lesson: When you have an acre with plants spread out all over the place (even on a small portion of that acre), 500 feet doesn’t go far. This time she put in two systems, one off the hose bib by the back door and one by the front door.

Between the two, it covers part of the plants behind the house, all of the front garden area, and up one side of the driveway. The next 500 feet I put in will take care of the other side of the driveway, my vegetable beds, and the patio. I’m sure there will be plenty more lessons learned along the way!


Is that a backache, Inga?? Thank you so much for making my gardening easier!

A hui hou!

Red Quinoa Tabouleh


If you’ve never tried quinoa or would like to know more about it, check here. Tabouleh is traditionally made with bulgur, which is made from wheat. Quinoa gives a great nutty flavor and is great for those who can’t eat wheat.

The first time I tasted quinoa (pronounced KEEN-wah) was in the early 90s when I lived in Tucson. A friend was a caterer and made a quinoa salad. I was hooked, but I never tried to make anything with it myself. Recently, I bought a bag of red quinoa from the bulk bin at a health food store, determined to try cooking it myself.

A friend here in Kona invited me over for lunch a couple weeks ago. She made a Quinoa Tabouleh from a recipe found on a prepackaged bag of quinoa. Here is my own version, using the red quinoa sitting in my cupboard.


RED QUINOA TABOULEH

1 cup cooked and cooled quinoa (See “Notes” on how to cook quinoa)
½ cup chopped parsley
¼ cup chopped chives
1 tablespoon chopped fresh mint
1 clove minced garlic
1 tablespoon minced fresh basil
Juice of one large lime
1/8 cup Extra Virgin Olive Oil
1/8 teaspoon freshly ground sea salt
Freshly ground pepper to taste

Toss all the ingredients together. Chill to allow flavors to blend before you eat.

This amount makes enough for one large serving, or two or three smaller servings. The Bearss lime was picked from my tree, and the herbs were all freshly picked from my garden. I’ll definitely make this again.

Notes: For this recipe, bring 1 cup water to a boil in a sauce pan. Add ½ cup quinoa and brought it back to a boil. Then cover, lower heat to medium and cook until water is fully absorbed by the quinoa, about 12+ minutes. Take it off the heat, fluff it up, cover again, and let it stand. I should have added a smidge more water to this and let it cook a little longer. You need to test it to make sure you can chew it. My dish was a little nuttier than I remembered, but it was still tasty.

The top photo was taken with flash; this one was made with no flash. Which do you think makes the tabouleh look better?

A hui hou!

This post was entered into the “Grow Your Own” roundup, created by Andrea’s Recipes and hosted this month by House of Annie.

Big Island Resort – Waikoloa Hilton

While many of my friends and relatives are suffering under severe winter weather, I’m living here in sunshine and warm weather. I have had my share of cold, snowy and icy winters, so I’m not sorry to be living here now.

This past summer I attended a conference that was held at the Hilton Waikoloa here on the Big Island. I drove up from my home to attend. It was great fun to act like a tourist on my own island.

I spent several afternoons walking around the grounds and taking pictures. There were too many to put here individually, and the collages I’ve made don’t do it justice, so please look at this slide show before you read another word. http://picasaweb.google.com/s/c/bin/slideshow.swf


For a full-sized slideshow, click here

I first visited this hotel in 1995, fifteen years ago, and I’m still never tired of finding something new around a corner. I enjoy the dolphin area most of all. They are so playful. Check out the Dolphin Quest to find out more.


Most visitors are captured by the romance of riding to your room on a boat through the lagoons, even though they are man-made.


Along the edges of the boat ways you’ll find statues and birds of all sorts.


I have traveled extensively throughout Japan on many different occasions, so I loved finding the strong Japanese influence on the décor throughout the hotel and grounds.


Around the swimming pool you’ll find statues that represent the animals of the Chinese zodiac. I don’t think I got them all. Some were hidden from my line of sight.


Down the walkways of the hotel you’ll find works of art and more statues of Kwan Yin and other Bodhisattvas. I’ve done another post on Kwan Yin, but I didn’t show you all of the ones I photographed there.


A hui hou!